5-Step Best Homemade Eskimo Pie Popsicle Recipe
Some desserts don’t just taste good — they take you back.
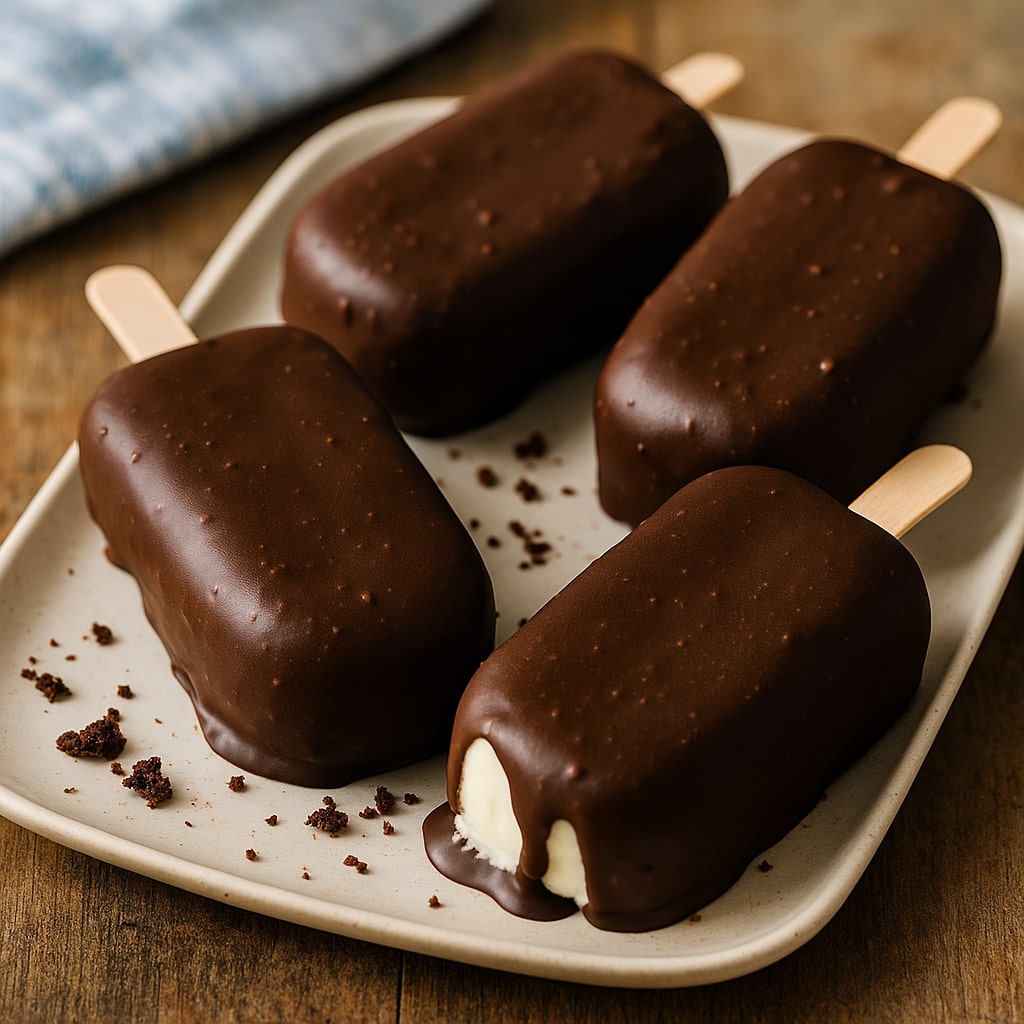
This best homemade Eskimo Pie popsicle recipe is one of those rare frozen treats that brings childhood rushing back with a single bite.
That first crack of glossy chocolate shell… the creamy, cold center melting on your tongue… it’s not just dessert — it’s a moment.
But here’s the best part:
You don’t need a fancy kitchen, an ice cream machine, or hours of prep.
Just a few ingredients, a little freezer space, and a craving for something nostalgic.
Whether you’re making these for the kids, your inner child, or your late-night snack stash, this recipe hits that perfect sweet spot between fun and indulgent.
It’s a no-fuss, feel-good treat that turns your freezer into a happy place.
So grab your molds, warm up some chocolate, and let’s make a popsicle that feels like summer, childhood, and comfort — all on a stick.
Because homemade is always better.
And this? This one’s the best of the best.
Why This Is the Best Homemade Eskimo Pie Popsicle Recipe
There’s something magical about desserts that crackle, melt, and comfort all at once.
This best homemade Eskimo Pie popsicle recipe isn’t just a frozen treat — it’s a little piece of joy on a stick. It takes everything you love about those iconic chocolate-covered ice cream bars and makes them even better, because now… you control the flavor, the texture, and the ingredients.
Here’s why this recipe really stands out:
1. It’s Creamy, Cold, and Cracks Just Right
The creamy center hits you with silky smoothness, while the outer shell gives that perfect snap when you bite in. That glossy chocolate shell? It’s better than store-bought. Promise.
2. Totally Customizable
Want to go classic vanilla? Or swirl in some peanut butter, berries, or cookie crumbs? You’ve got options. This recipe gives you the base — the rest is up to your cravings.
3. Made with Simple, Real Ingredients
No unpronounceable ingredients. No artificial aftertaste. Just real stuff you already love — like coconut oil, dark chocolate, creamy ice cream or yogurt, and whatever little extras you want to sneak in.
4. Kid-Approved, Adult-Loved
Whether you’re making these for your kids, your partner, or your midnight self, these homemade Eskimo Pie popsicles bring smiles every time. And let’s be honest… they taste way better than anything in a box.
5. That Feeling of “I Made This”
There’s something weirdly satisfying about pulling your own chocolate-dipped popsicle out of the freezer, knowing you made it. It feels nostalgic and proud all at once — like you brought back something sweet from childhood and made it even more special.
So yes — this isn’t just the best homemade Eskimo Pie popsicle recipe because it’s delicious.
It’s the best because it feels yours.
And once you make it once… you’ll want it in your freezer all summer long.
Ingredients You’ll Need for the Best Homemade Eskimo Pie Popsicle Recipe
The magic of this best homemade Eskimo Pie popsicle recipe starts with simple ingredients — the kind that feel familiar, fun, and just a little indulgent.
Nothing fancy. Nothing complicated. Just creamy, chocolatey goodness with a DIY twist.
Here’s everything you’ll need to get started:
Main Ingredients
| Ingredient | Why It’s Used |
|---|---|
| 2 cups vanilla ice cream or Greek yogurt | Creates the creamy, rich filling that chills beautifully |
| 1 ½ cups dark or semi-sweet chocolate chips | Forms the classic crisp chocolate shell |
| 2 tablespoons coconut oil | Makes the chocolate coating smoother and snappier |
| 1 teaspoon vanilla extract | Boosts the flavor of your filling |
| Popsicle molds + wooden sticks | Essential for shaping and freezing your treats |
Optional Add-Ins
- Crushed Oreos or graham crackers – for a fun crunch inside
- Peanut butter or Nutella swirls – for richness and depth
- Sea salt or chopped nuts – for texture and contrast
Want another wholesome recipe that brings texture, nostalgia, and bold flavor together? Check out this seeded miso sweet potato bread recipe — it’s soft, savory, and surprisingly simple to make at home.
How to Make the Best Homemade Eskimo Pie Popsicle Recipe (Step-by-Step)
There’s something almost therapeutic about making your own frozen treats. You don’t just mix — you create memories.
I remember the first time I tried this best homemade Eskimo Pie popsicle recipe. I was aiming for something nostalgic but ended up with a freezer full of happiness.
So, here’s how to do it right — the way I’ve learned through trial, a little error, and a lot of chocolate-dipped smiles.
Step 1 – Make the Creamy Base
Start by softening your ice cream just enough so it’s easy to stir — not melted, just scoopable. If you’re using Greek yogurt, whisk in your vanilla extract for flavor.
You can stir in crushed cookies, peanut butter swirls, or even a little cinnamon if you’re feeling creative. This is your base. Make it count.
Tip: Choose high-quality, real vanilla extract. It adds depth and gives your pops a gourmet edge — even if they’re meant to be fun.
Step 2 – Pour into Molds and Freeze
Spoon the creamy mix into your popsicle molds, smoothing the tops with the back of a spoon. Insert wooden sticks, then freeze for at least 4–6 hours — overnight is even better.
This is the part where patience makes magic.
Personal Tip: Don’t overfill. Leave a tiny bit of room at the top — it helps prevent overflow when they expand during freezing.
Step 3 – Melt the Chocolate Coating
While your pops are setting, melt your chocolate chips and coconut oil together in a heat-safe bowl. You can do this over a double boiler or in the microwave in short bursts (15–20 seconds at a time), stirring each time.
Once smooth and glossy, let it cool slightly — it should be warm but not hot.
This is the secret sauce — literally. That coconut oil gives the shell its signature snap and shine.
Step 4 – Unmold and Dip in Chocolate
Carefully remove the frozen popsicles from the molds. If they’re stuck, run warm water over the outside of the mold for a few seconds — they’ll slide out like a dream.
Dip each pop into your melted chocolate and hold it upright. Watch that glossy shell harden in seconds — it’s kind of addictive to witness.
Human moment: I’ve never NOT smiled at that satisfying snap. It’s the frozen dessert equivalent of popping bubble wrap.
Step 5 – Chill, Serve, and Savor
Place the dipped pops on a parchment-lined tray and freeze for 10 more minutes so the coating fully sets. Then… it’s time.
Serve immediately or wrap them individually for later. Whether you’re sharing or sneaking one before bed, the joy is the same.
This best homemade Eskimo Pie popsicle recipe isn’t just easy — it feels good to make. And even better to eat.
Pro Tips for Texture, Flavor & Snap
Let’s be real — the difference between “just okay” and wow, you made this? often comes down to the small things.
I’ve made this best homemade Eskimo Pie popsicle recipe more times than I can count. And every time, I learn a new little trick that makes the next batch better. Here are the tips I swear by — the ones that make your popsicles not just good, but memorable.
1. Use Coconut Oil in the Chocolate
This isn’t optional. Coconut oil thins the chocolate perfectly, helps it set faster, and gives you that beautiful shell crack with every bite. Without it? The coating can be too thick or slow to harden.
Pro tip: Use refined coconut oil if you don’t want a coconut flavor.
2. Let the Chocolate Cool Before Dipping
It should be warm, not hot. If the coating is too hot, it can melt the outer layer of the frozen pop and cause streaking — or worse, it won’t stick properly. Think smooth, gentle dip — not scalding splash.
3. Run Warm Water on the Molds, Not the Pops
Don’t tug.
Just run warm water on the outside of the mold for 5–10 seconds and wait for the magic. Pops will slide out clean, without cracks or broken edges.
4. Use Parchment Paper for Post-Dip Perfection
Once dipped, lay the pops on parchment — not foil, not a plate, not paper towels. Parchment prevents sticking and helps them keep their flawless finish.
5. Don’t Skip the Resting Freeze
After dipping, give your popsicles 10–15 more minutes in the freezer to really let that chocolate shell set. It keeps them looking pretty, tasting fresh, and feeling bakery-grade.
Bonus Tip: Make a Batch While Cooking Dinner
One of my favorite hacks? Prep a popsicle batch while waiting on dinner to finish — like this low sodium meatball recipe that simmers low and slow. While it cooks, you’ve got just enough time to pour, swirl, and freeze. Easy, satisfying, and productive.
These tips aren’t just fluff — they’re what turn a quick dessert into a homemade win you’ll feel proud to serve. And with this best homemade Eskimo Pie popsicle recipe, every little extra touch makes it even more worth it.
Fun Variations to Try
Once you master the basics of this best homemade Eskimo Pie popsicle recipe, it opens up a whole new world of frozen creativity. Because let’s be honest — part of the joy of making these at home is putting your own spin on them.
Sweet? Salty? Swirled? Fruity? You can totally play.
Here are some fun ideas that I’ve tested (and loved) — all simple, all crowd-pleasers.
1. Peanut Butter Crunch
Swirl in creamy peanut butter to your base before freezing, then roll the dipped pops in crushed peanuts right after coating. It’s nostalgic, protein-packed, and super satisfying.
2. Berry Jam Explosion
Spoon in a layer of strawberry, raspberry, or blueberry jam halfway through filling the molds. When you bite in, you get that sweet little surprise in the center — like a frozen jelly donut.
3. Cookies & Cream
Crush up Oreos or chocolate graham crackers and fold them into the ice cream base before pouring. Finish with a sprinkle of crumbs over the chocolate shell for that “bakery-style” finish.
4. Vegan & Dairy-Free Options
Swap in coconut milk-based yogurt or banana puree with almond milk. Then use vegan dark chocolate for dipping. The texture stays creamy, and honestly? The flavor is just as rich.
5. Healthier Popsicle Ideas
Want to make your treat a little lighter without losing the fun? Add in fresh fruit, skip refined sugar, or go for Greek yogurt and honey combos.
If you’re exploring more wholesome options, here’s a helpful guide on How to make popsicles healthy? — packed with vibrant, natural ideas that blend flavor and nutrition beautifully.
Perfect for when you want indulgence with a smart twist.
At the end of the day, this best homemade Eskimo Pie popsicle recipe is your blank canvas.
So swirl it. Top it. Add a crunchy layer. Or go pure and classic.
Whatever you do, make it yours — that’s the best part of doing it homemade.
How to Store Homemade Eskimo Pie Popsicles
You’ve done the work — creamy base, glossy shell, that perfect snap.
Now the question is: How do you keep them fresh, neat, and ready to grab whenever the craving hits?
The beauty of this best homemade Eskimo Pie popsicle recipe is that it stores beautifully — as long as you give it a little love and the right setup.
Wrap Individually for Freshness
Once your popsicles are fully frozen and the chocolate coating has set, wrap each one in parchment or wax paper. This keeps them from sticking to each other and preserves that gorgeous finish.
Avoid plastic wrap! It can cling to the chocolate and mess up your shell — and nobody wants a peeled-off coating.
Store in an Airtight Container
After wrapping, place the popsicles in an airtight container or reusable freezer-safe bag. Lay them flat in a single layer if you can. Stack carefully if needed, with parchment between layers.
This prevents freezer burn and protects their shape.
How Long Do They Last?
For best taste and texture, enjoy within 2–3 weeks — although let’s be honest, they rarely last that long! The chocolate stays snappy, and the creamy center stays just right.
Want to pair one with a light summer dinner? Try these Cuban garbanzo beans — a savory, protein-rich dish that balances beautifully with a sweet, cold bite afterward.
Quick Tip: Label & Rotate
If you’re making popsicles often (guilty!), date them with a sticky note or freezer marker. That way, the freshest batch always goes in last — and nothing gets forgotten in the back of the freezer.
Storing these right doesn’t just help them last.
It helps you enjoy the experience again and again — whenever you need a little cold comfort or a nostalgic smile.
FAQs About Best Homemade Eskimo Pie Popsicle Recipe
Still have questions? Totally get it. This best homemade Eskimo Pie popsicle recipe may be simple, but a few clever tricks can take it from good to incredible.
Here’s what people usually ask — with honest, helpful answers to make your popsicle-making experience even smoother:
Can I make these dairy-free or vegan?
Absolutely! Just swap in coconut milk yogurt, cashew ice cream, or even a banana-almond milk blend. Use vegan dark chocolate for the coating.
The texture stays creamy, and the flavor is just as dreamy — no compromise.
What’s the best chocolate to use for dipping?
Use semi-sweet or dark chocolate chips with a touch of coconut oil. This combo melts beautifully, sets fast, and gives that signature crack when you bite in. Milk chocolate works too — but the snap won’t be as strong.
How do I get popsicles out of the molds without breaking them?
Run warm (not hot) water over the outside of the mold for 5–10 seconds. Then gently wiggle the sticks until the pops slide out. Don’t rush — it’s all about the slow release.
Can I reduce the sugar?
Yes! Use unsweetened Greek yogurt or a low-sugar ice cream base. You can even skip sweeteners entirely if you’re using a naturally sweet jam or fruit mix-in. The chocolate shell will still bring the indulgence.
How long can I store them in the freezer?
Wrapped and sealed well, these pops stay fresh for up to 3 weeks — though they rarely last that long. Proper storage keeps the chocolate crisp and the center smooth.
Can I add nuts, sprinkles, or cookie crumbs to the outside?
Yes, and please do! Dip the coated pops in toppings immediately after chocolate dipping — before the shell hardens. It’s a fun way to add texture and make them party-ready.
No question is too small when it comes to making something this fun.
This best homemade Eskimo Pie popsicle recipe isn’t just about instructions — it’s about getting creative and making it your own, every single time.
Final Thoughts on This Best Homemade Eskimo Pie Popsicle Recipe
At the end of the day, it’s not just about frozen dessert.
It’s about slowing down, getting a little messy in the kitchen, and reliving the kind of simple joys that made summers unforgettable.
This best homemade Eskimo Pie popsicle recipe brings all of that — creamy nostalgia, crackly chocolate magic, and the kind of satisfaction that comes from saying, “I made this.”
You don’t need a fancy machine.
You don’t need perfect technique.
You just need a craving for something cold, sweet, and soul-soothing.
And once you’ve made it once — just once — this best homemade Eskimo Pie popsicle recipe becomes a staple.
It’s the kind of treat that shows up at birthdays, family nights, or those random Tuesday evenings when you need a bite of happiness.
So freeze a batch, keep them ready, and reach for one whenever you want to feel like a kid again — or just want to give someone else that feeling.
Because when it comes to frozen treats?
This really is the best homemade Eskimo Pie popsicle recipe you’ll ever make.