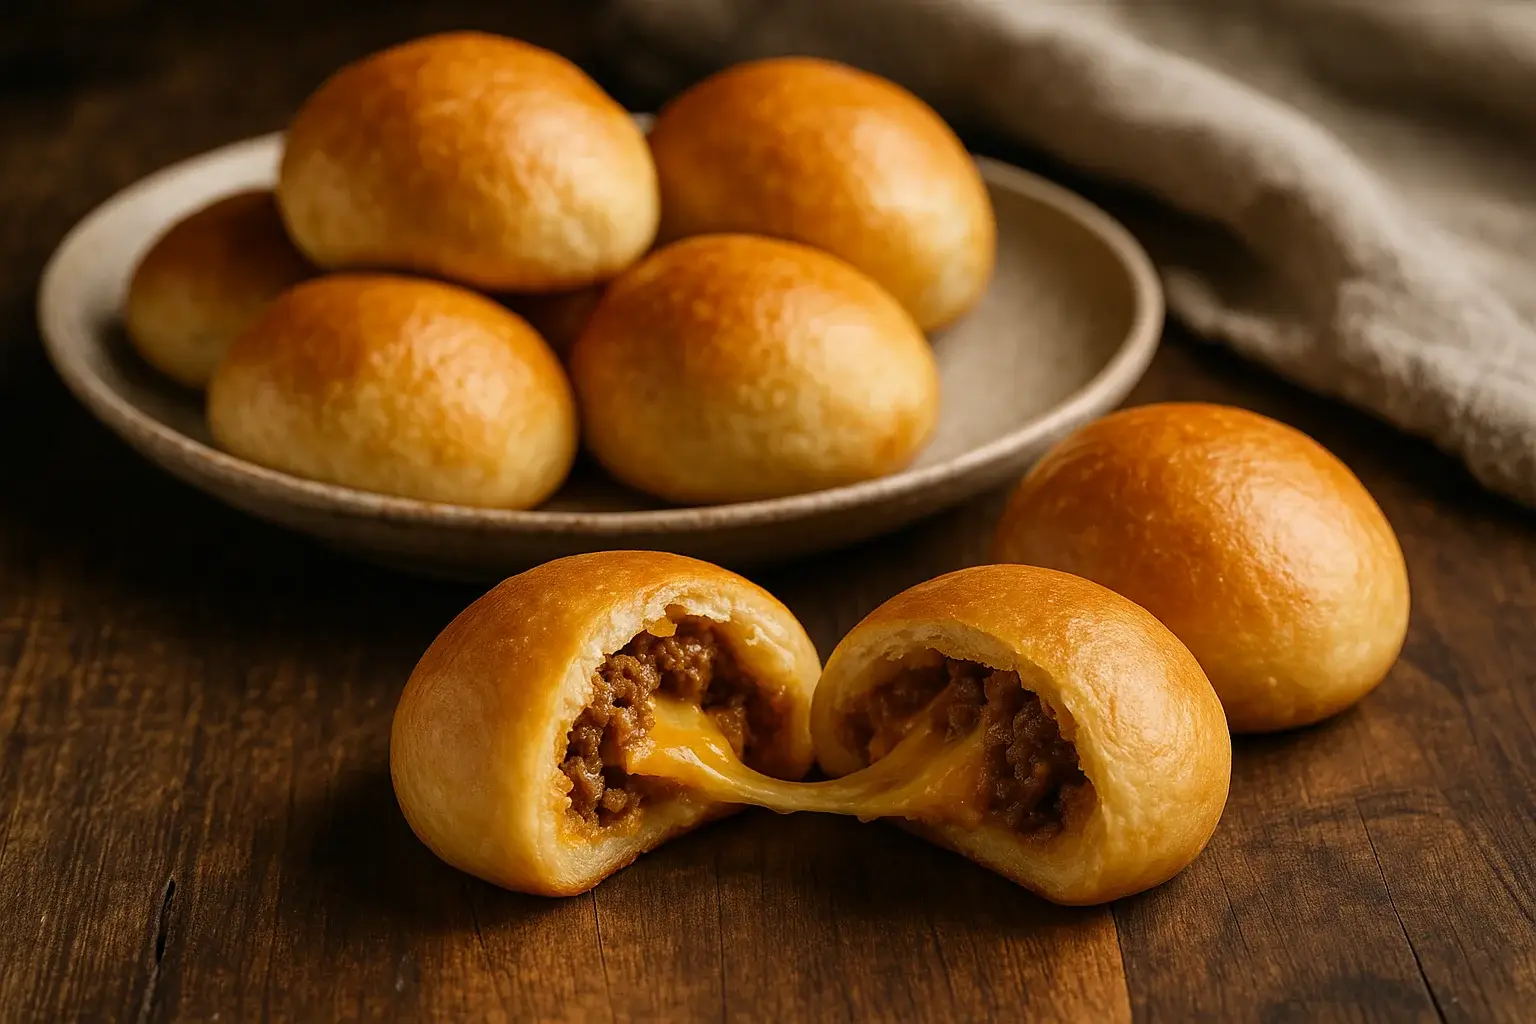
How to Make DIY Taco Bombs That Are Cheesy, Easy & Crowd-Approved
Taco night was getting boring.
Same tortillas. Same mess. Same clean-up I dreaded after a long day.
So I tried something new—rolled the whole thing up, sealed it in biscuit dough, baked it till golden… and boom.
Taco bombs.
Crispy on the outside. Melty on the inside. And packed with everything I love about tacos—without the drippy disaster.
Now? These DIY taco bombs are my go-to for busy weeknights, lazy Sundays, or whenever I want to impress without trying too hard.
They take less than 30 minutes, use basic pantry stuff, and work in both the oven and air fryer. Plus, they’re fun to customize—add beans, spice it up, or keep it classic. No rules here.
In this guide, I’ll walk you through my exact method (plus a few smart tricks I’ve learned the hard way). And if you’re curious how these compare to those juicy, slow-cooked birria bombs I’m obsessed with—I’ll sprinkle that in too.
Trust me—once you try these, taco night won’t go back to normal.
What Makes a Taco Bomb… a Bomb?
A taco bomb is a sealed, handheld snack made by wrapping seasoned taco filling inside dough, then baking or air-frying it until golden and crispy.
It’s like your favorite taco—only cleaner, cheesier, and a whole lot more fun to eat.
Now let me tell you why I love them so much.
Unlike regular tacos that fall apart halfway through the bite, taco bombs keep it all tucked inside. The dough traps steam, melts the cheese, and locks in flavor like a little pressure cooker. When you break one open, it’s steamy, gooey, and packed with taco goodness.
They’re perfect for busy weeknights, picky eaters, or any time you want something fun and mess-free.
And once you’ve nailed this easy version, you’ll start exploring bold twists—like stuffing them with slow-simmered birria beef, just like I do in my slow-cooked birria bombs. Now that’s a next-level flavor bomb.
But first—let’s get your base version locked in. Because after that, the variations are endless.
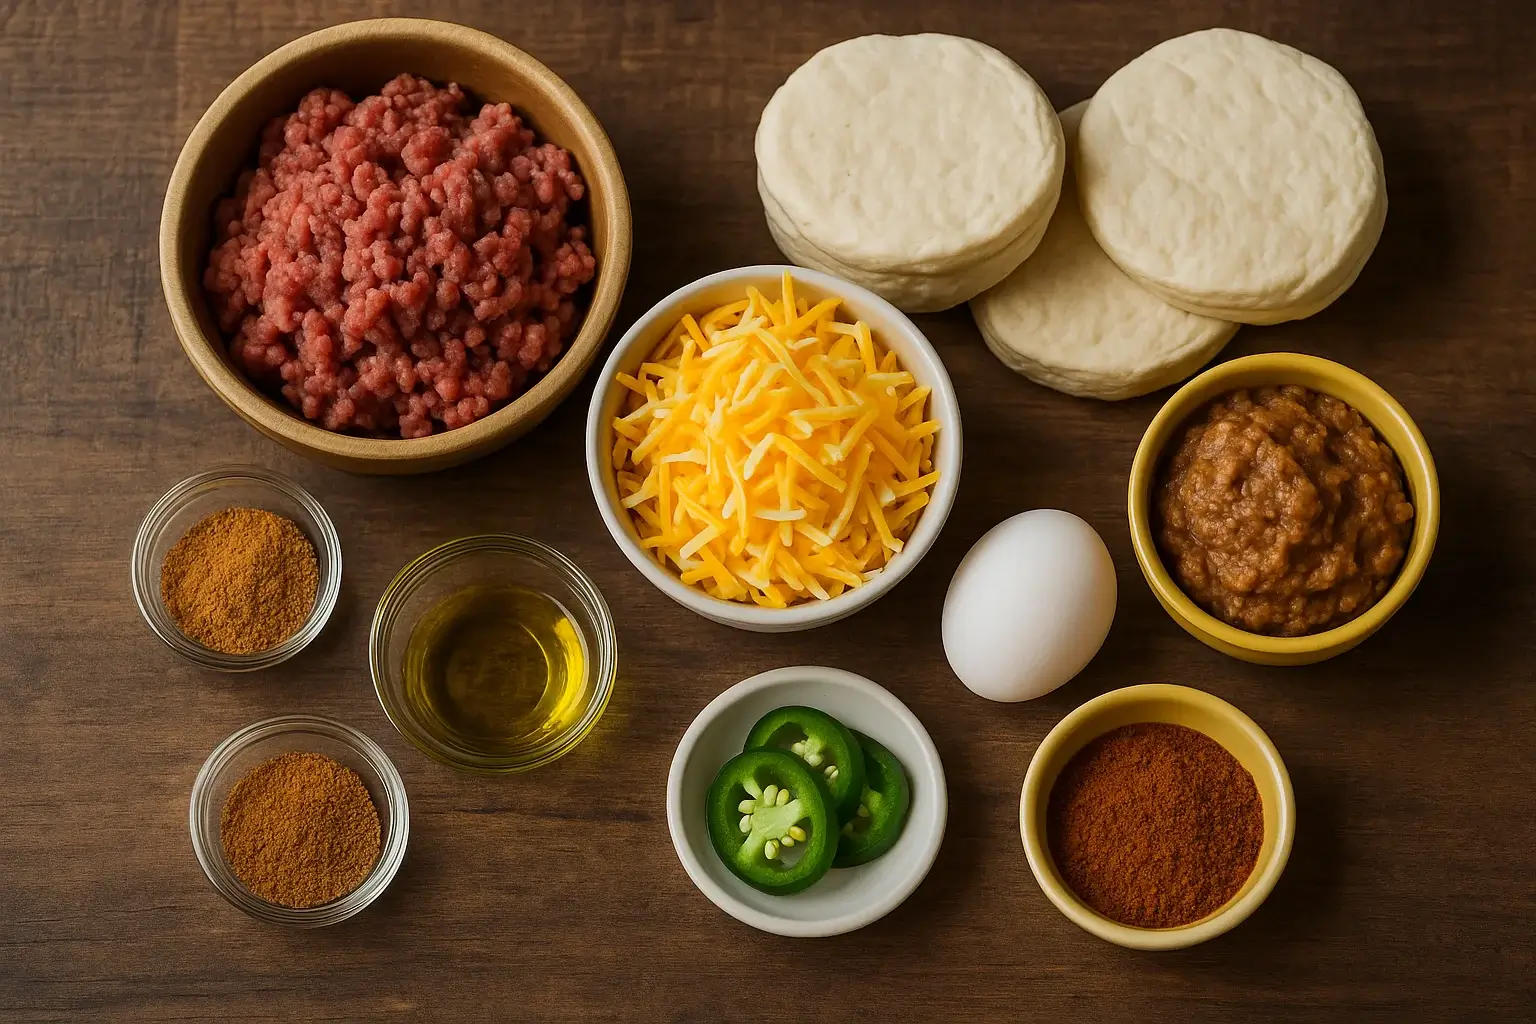
DIY Taco Bombs – What You’ll Need
Before we get into the rolling, stuffing, and sealing—let’s talk prep.
To make DIY taco bombs at home, you’ll need two simple things:
👉 Ingredients — for that classic cheesy taco filling wrapped in dough
👉 Tools & Equipment — to help you bake or air fry them to golden perfection
I’ve broken both down below so you know exactly what to grab from your fridge and kitchen drawers. Don’t worry, everything’s beginner-friendly—and I’ll even suggest a few swaps if you’re missing something.
Scroll down and take a look—I’ve got you covered 👇
Ingredients
Let’s build the flavor from the inside out—because what goes into the bomb, stays in the bomb.
That’s it—you’re just a few fridge staples away from taco bomb greatness.
Next up, let’s get your tools and tray ready so we can bring this thing to life 🔧🔥
Tools & Equipment
If ingredients build the flavor, these tools bring the whole thing together.
I’ve learned the hard way—missing just one thing mid-recipe can ruin your flow.
So before you start stuffing and sealing, take a quick look through this table.
Write these down, or come back to it when you’re ready to cook.
Trust me, when the dough’s in your hand and your oven’s preheating, you’ll be glad everything’s within reach.
That’s your taco bomb toolkit—nothing fancy, just smart tools that make all the difference.
Keep this list handy when you’re prepping… it’ll save you time (and cleanup stress) later.
How to Make Taco Bombs – Step-by-Step
I’m going to show you two ways to make taco bombs at home—both easy, both delicious, and both guaranteed to make dinner feel like the best part of your day.
One is oven-baked: soft, golden, perfect when you’re feeding a hungry crowd.
The other? Air fryer magic—crisp, quick, and ideal when you’re running low on time but still want something melty and sealed just right.
All I ask? Follow these steps exactly the way I walk you through them.
Because when you get to the end and take that first bite… you won’t care about any other version you’ve ever tried.
That’s exactly what happened when I first tested this recipe—right after I made my bold and juicy instant pot birria bombs that were all about speed. This one? It became the comfort food I never knew I needed.
Now it’s your turn—pick your method, follow along, and let’s make some bombs worth bragging about.
Method 1: Oven-Baked Taco Bombs (Soft, Golden & Crowd-Friendly)
Step 1: Preheat your oven to 375°F (190°C)
You want that oven hot before anything goes in—this ensures the dough puffs up and browns evenly. I usually give it a solid 10 minutes to get there.
Step 2: Cook your taco filling
Grab your skillet, heat it over medium, and toss in the ground meat. Break it apart with a spatula, stir in taco seasoning, and let it cook down until the moisture reduces slightly.
👉 Tip: A dry-ish filling = no soggy bombs later.
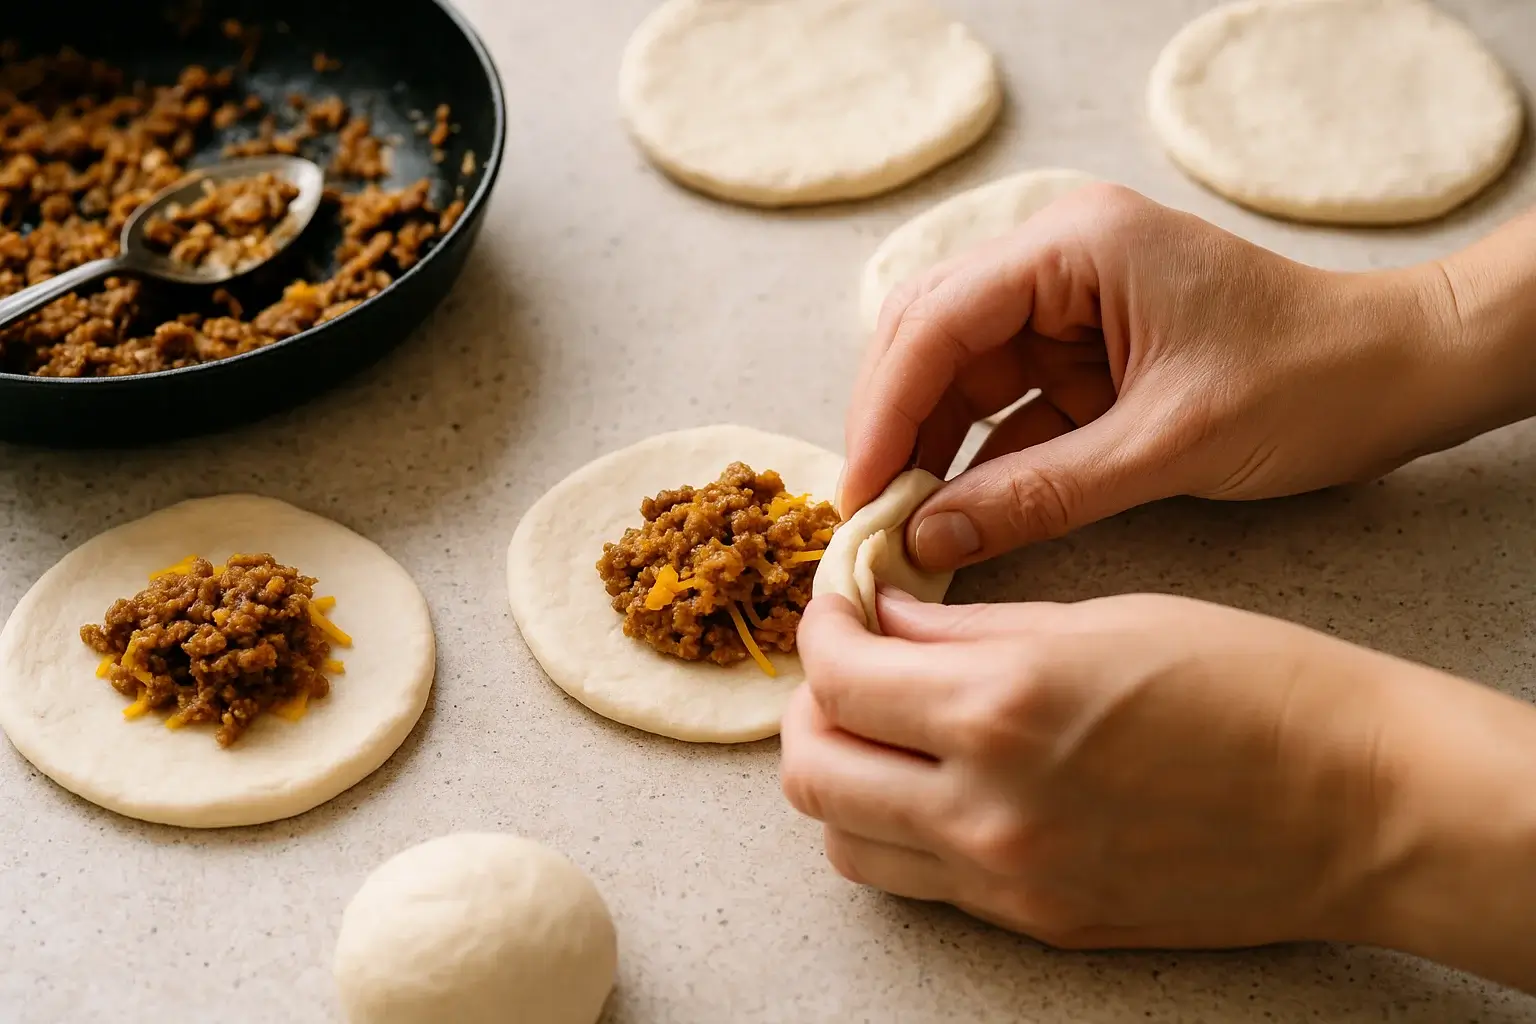
Step 3: Flatten the dough
Take out your biscuit dough and gently press each round into a small circle (about 4 inches wide). Use your hands or rolling pin—doesn’t matter, just don’t overstretch.
You need enough room to stuff and seal without tearing.
Step 4: Add the filling and seal it tight
Place about 1 tablespoon of the taco meat into the center of each dough circle. Add shredded cheese—and if you’re feeling extra, a little bean or jalapeño action.
Fold the dough over, pinch it closed with your fingers, then press the edges with a fork to crimp.
👉 You want it sealed tight so it doesn’t burst while baking.
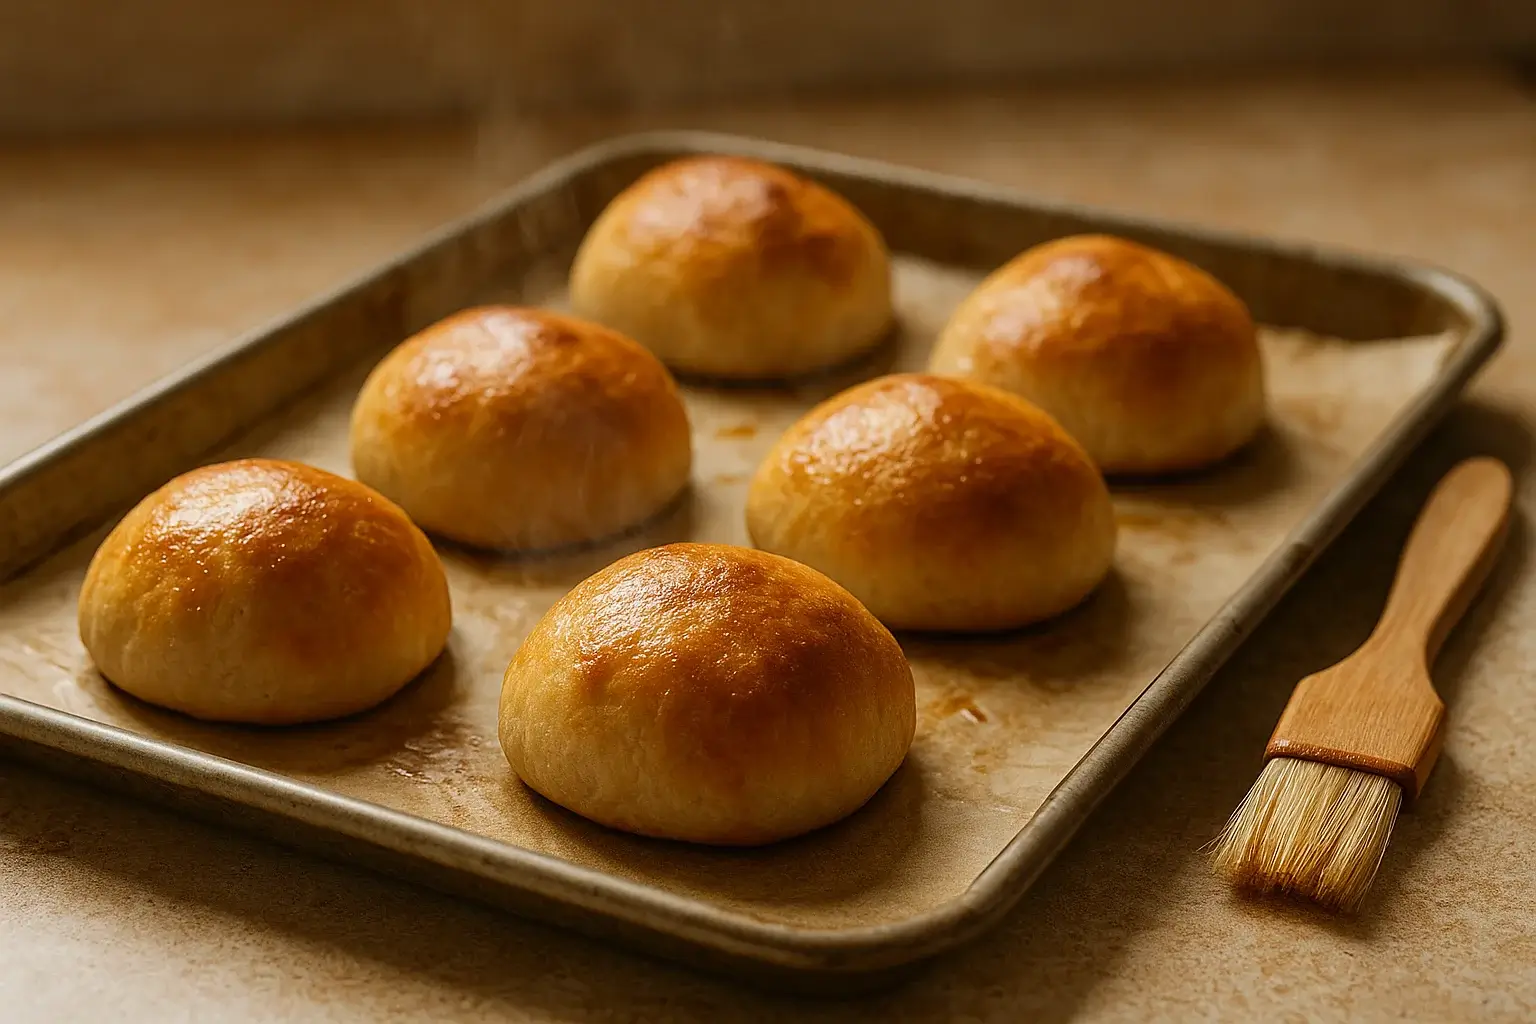
Step 5: Brush and prep for baking
Line a baking tray with parchment paper. Place your taco bombs on the tray and brush the tops with a little egg wash or olive oil.
This gives them that golden, glossy finish you’ll want to Instagram later.
Step 6: Bake for 12–15 minutes
Slide the tray into the oven and let them do their thing. You’ll know they’re ready when the tops are golden brown and slightly puffed.
Keep an eye around the 12-minute mark—every oven’s got a mind of its own.
Step 7: Cool, then serve
Let them rest for 3–5 minutes after baking. The insides stay hot longer than you think, and trust me—you don’t want to burn your mouth on molten cheese.
That’s it. Easy, right? One tray, one bite, and you’ve got something way better than taco night.
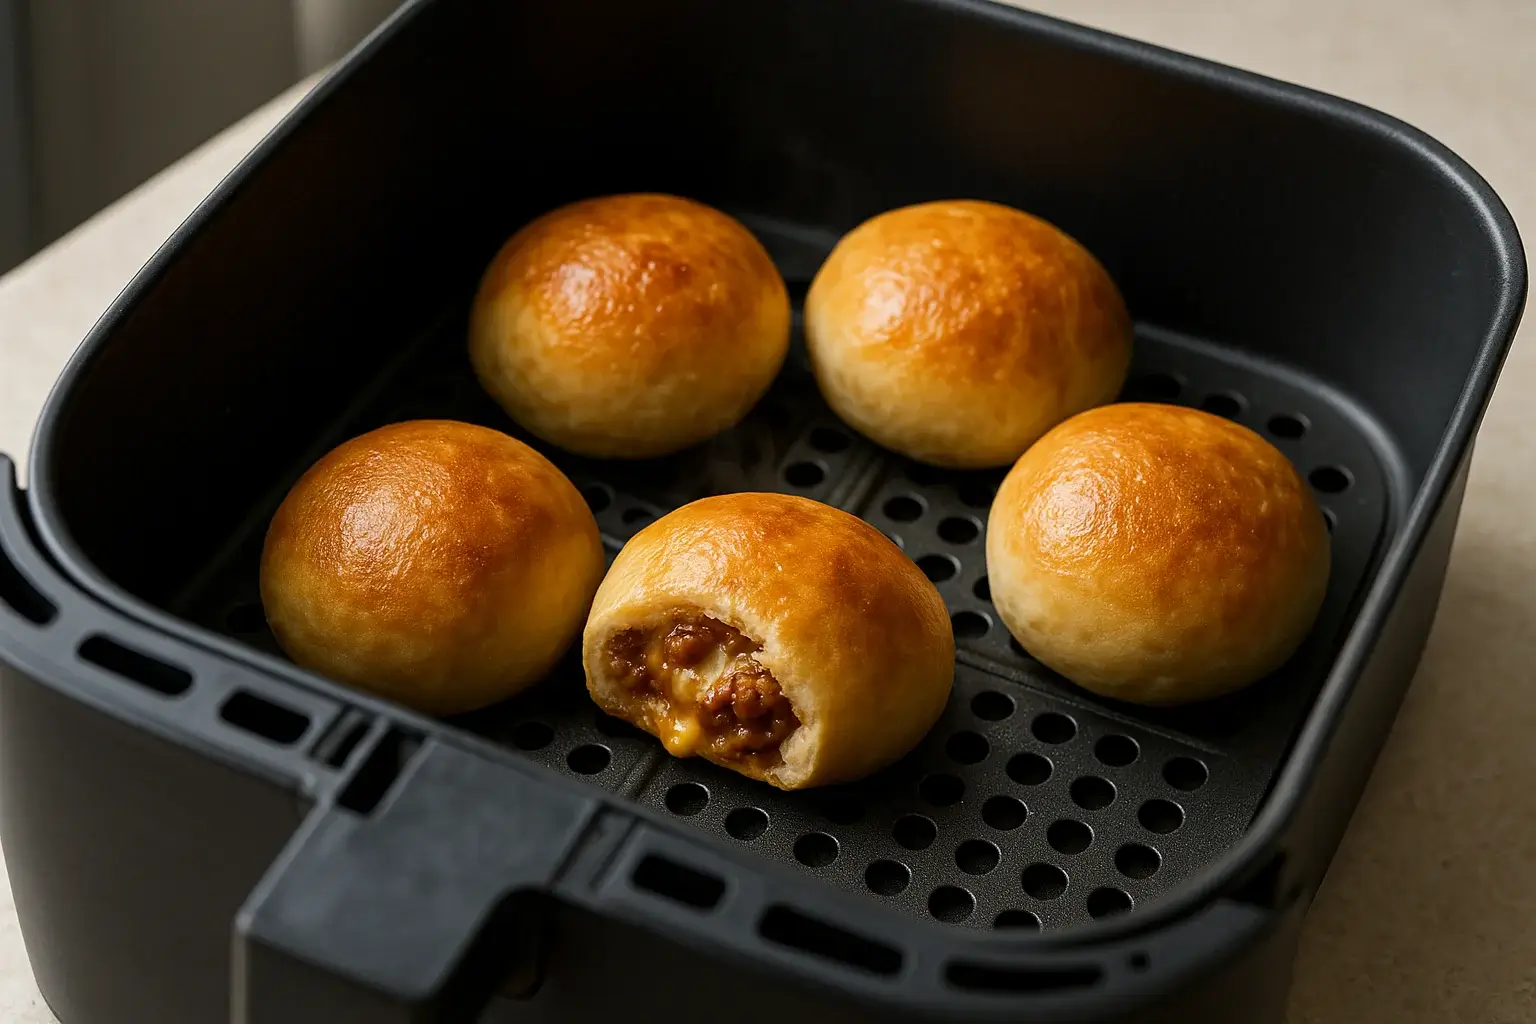
Method 2: Air Fryer Taco Bombs (Quick & Crispy)
Short on time but still craving that cheesy taco bomb goodness?
The air fryer’s your best friend.
This method gets you crispy outsides and melty insides—in less than 15 minutes total.
Let’s do this.
Step 1: Preheat your air fryer to 350°F (175°C)
Yep, air fryers preheat too—even if they act like they don’t. Give it 3–5 minutes to get hot so the bombs start crisping the moment they go in.
Step 2: Prepare your filling and dough just like the oven method
Cook the meat, flatten the dough rounds, and stuff with cheese and taco filling. Fold, pinch, crimp. You know the drill.
👉 Don’t skip the fork crimp—it matters more in the air fryer where movement happens.
Step 3: Lightly brush or spray the bombs
Use a bit of oil or egg wash over the tops.
This helps them get that golden crust and keeps the surface from drying out under hot air circulation.
Step 4: Air fry in batches
Place 3–4 taco bombs in the basket—don’t crowd them.
Cook for 8–10 minutes, flipping halfway through.
They should be golden, slightly firm, and crisp on the outside.
👉 Pro Tip: Use tongs or a spatula when flipping. Avoid squashing that fluffy dough.
Step 5: Let them cool before biting in
Air fryer bombs come out hot. Like cheese-lava hot. Give them a couple minutes to settle before digging in.
This is the method I use when I’ve got no time, no energy, but still want something bold and crunchy. Fast, crispy, no compromise.
My Best Tips to Make Sure Your Taco Bombs Turn Out Perfect
I’ve made taco bombs more times than I can count—on rushed weeknights, game day parties, even once during a blackout with nothing but an air fryer and a flashlight (true story).
Here are the tips I’ve picked up through trial, error, and lots of cheese-filled victories.
Follow these, and your bombs will come out sealed, golden, and full of flavor—every single time.
👉 Seal tight, or lose the magic
Use your fingers and a fork to press those edges. If they’re not sealed all the way, they’ll leak in the oven or burst in the air fryer.
👉 Don’t overfill (tempting, I know)
One tablespoon of filling is enough. Too much and the dough won’t close properly—it’ll tear or bulge open mid-bake.
👉 Use cheese that melts, not clumps
Sharp cheddar + mozzarella = melty perfection. Pre-shredded works, but freshly grated? Even better.
👉 Crescent dough? Totally works
If you don’t have biscuit dough, crescent roll dough or even pizza dough can be great backups. Just flatten it evenly.
👉 Spice control = guest control
Serving kids or spice-sensitive folks? Skip jalapeños and use mild taco seasoning. Want heat? Add hot sauce inside the filling instead of outside.
👉 Freeze them after baking, not before
They reheat better when fully cooked first. Let them cool, then freeze in a single layer. To reheat: 350°F oven for 10–12 minutes. Still crispy.
Small tricks. Big difference. These are the moves that take your taco bombs from “pretty good” to “where’d you learn to cook like this?”
What to Serve with Taco Bombs (Dips & Sides for the Win)

Taco bombs are bold on their own, but when you pair them with the right sides and dips?
Game over. Flavor explosion.
Here are some of my go-to pairings that turn this into a full meal—or an instant party tray:
🥣 Dips That Just Work
-
Sour cream with lime zest – balances the heat and adds a cooling touch
-
Nacho cheese sauce – ultra melty, ultra indulgent
-
Salsa roja or salsa verde – adds tang and heat in all the right places
-
Guacamole – because avocado + taco anything = yes
-
Chipotle mayo or spicy ranch – smoky, creamy, addictive
🍽️ Sides to Make It a Meal
-
Mexican street corn (Elote) – sweet, spicy, and cheesy corn on the cob
-
Cilantro lime rice – light and fluffy, perfect with taco flavors
-
Black beans or refried beans – add protein and round it out
-
Tortilla chips – keep it classic and crunchy
-
Simple tomato-cucumber salad – fresh contrast to the rich filling
Whether you’re feeding a crowd or just yourself—pairing right makes taco bombs taste even better.
And honestly? That guac-dip combo is dangerously good.
Taco Bomb Variations to Try
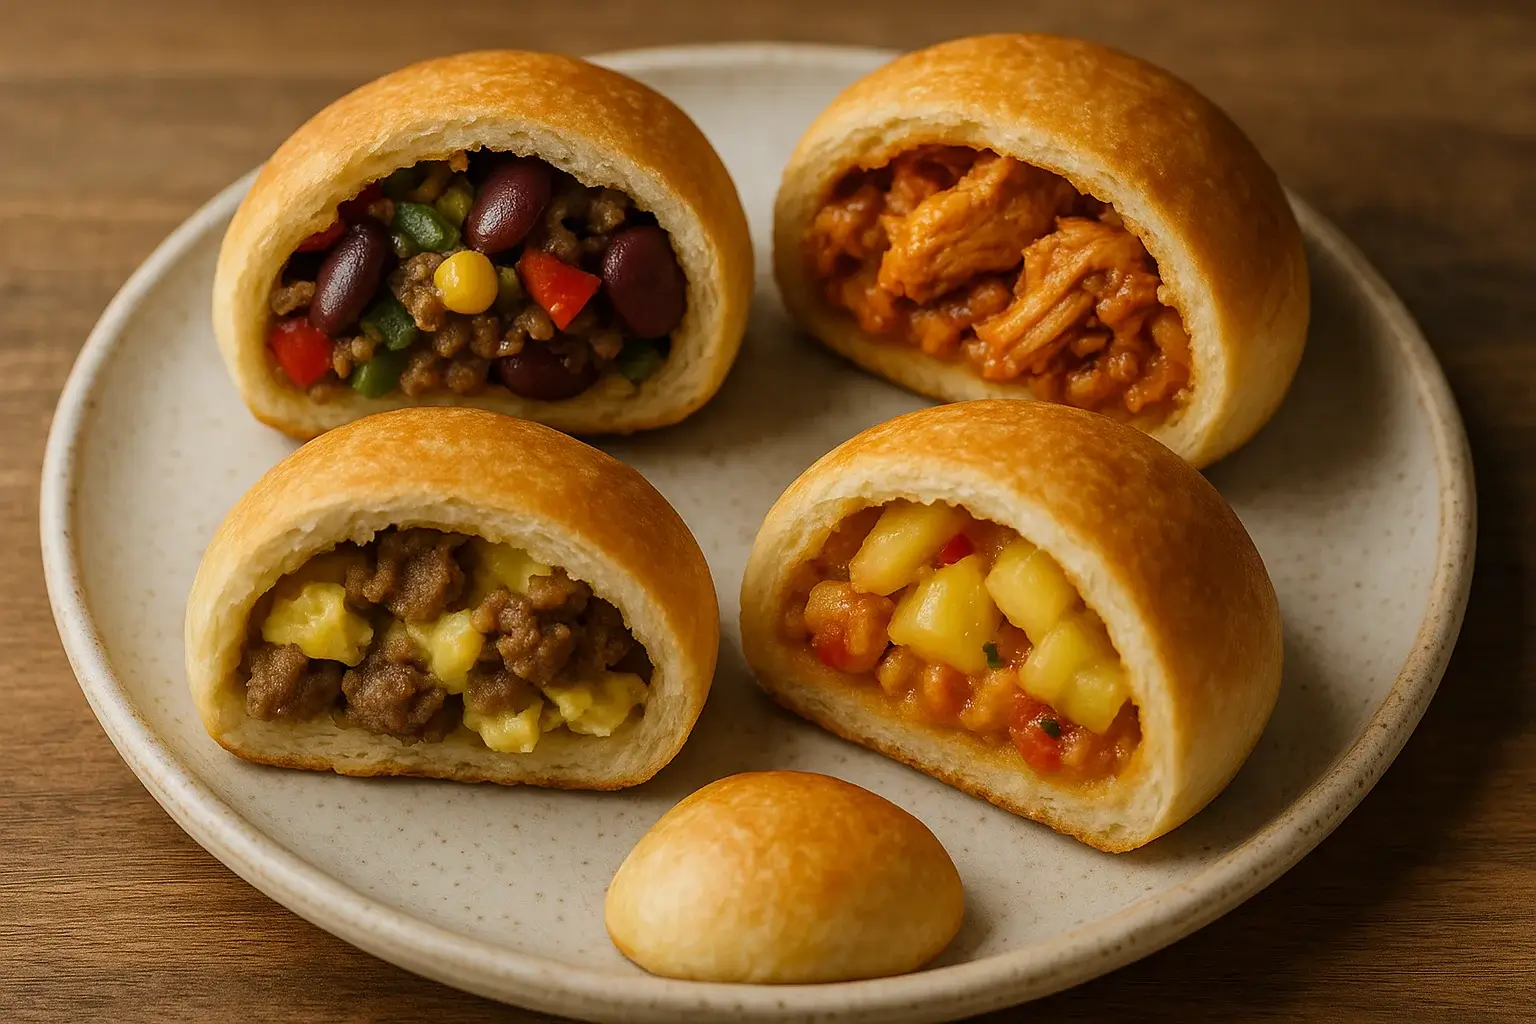
I’ve made this exact taco bomb recipe at least four or five times.
And I’ll be honest—I’m not the kind of cook who likes to make the exact same thing over and over again.
Once I’ve nailed a flavor, I get curious. What else could go inside that crispy little dough pocket?
So I start experimenting—swapping fillings, tweaking spice levels, testing combos I’ve seen in other kitchens or discovered during late-night scrolls down food rabbit holes on Google.
Why? Because I want to bring you not just what works—but what wows.
Everything below is something I’ve personally cooked, tasted, and served to real people (some of whom are brutally honest).
These aren’t random guesses. These are kitchen-tested taco bomb twists you can trust—and try yourself tonight.
Swap & Stuff Ideas
-
Veggie-loaded taco bombs – sautéed mushrooms, bell peppers, black beans, and cheese
-
Spicy breakfast bombs – scrambled eggs, sausage, shredded cheddar, and a dab of hot sauce
-
Sweet-n-spicy twist – add a spoon of mango salsa or pineapple-habanero mix inside
-
Buffalo taco bombs – shredded chicken tossed in buffalo sauce with ranch + mozzarella
-
Meat-free version – use lentils or soy crumbles + taco seasoning for plant-based flavor
There’s no one way to bomb a taco—so get creative, raid your fridge, and build your own signature version.
If you want to explore where this trend started and why it’s blowing up everywhere, check out my full guide on birria bombs: what they are & why they’re trending in 2025.
Storage, Reheating & Make-Ahead Tips
I’ve made these taco bombs four or five times now, and every time, I end up with a few extras cooling on the counter—because I always make a double batch “just in case.”
Good news? They store like a dream—and if you play it smart, they reheat with that same cheesy pull and crispy edge.
Here’s exactly how I handle mine:
-
Fridge storage:
Once cooled, I pack them in an airtight container and pop them in the fridge. They stay fresh for up to 3 days. Just make sure they’ve fully cooled before sealing—nobody likes soggy bombs. -
Freezing:
Cooked taco bombs freeze beautifully. I let them cool completely, lay them flat on a tray to freeze individually (so they don’t stick), then transfer them to a ziplock or freezer-safe container.
They’re good for up to 2 months—perfect for quick weeknight fixes. -
Reheating (Oven):
I preheat the oven to 350°F, place the bombs on a baking tray, and warm them for 10–12 minutes. The crust crisps back up, and the filling stays melty. -
Reheating (Air Fryer):
For an even faster fix, I air fry at 325°F for 6–8 minutes. They come out golden and hot, almost like they were just made. -
Microwave?
I’ll be honest—I avoid it. The dough gets soft and rubbery. If you have to use it, wrap the bomb in a paper towel and microwave for 30 seconds. But just know: the magic will be missing.
So whether you’re meal-prepping, saving extras, or planning ahead—these bombs have your back.
Make a double batch. You’ll thank yourself later.
FAQs
Can I make taco bombs ahead of time?
Yes. Cook the taco filling up to 1–2 days ahead, then store it in the fridge. Assemble the bombs just before baking or air frying for fresh taste and texture
Can I freeze taco bombs before or after baking?
Absolutely. You can freeze them after baking: cool completely, freeze individually, then bag. Reheat in a 350°F oven for about 10–12 minutes. They stay crispy and melty
Can I use a different kind of dough?
Totally. Biscuit dough works great, but crescent roll or pizza dough is a fine substitute—just flatten and seal tightly before cooking
How long do tacobombs stay good in the fridge?
Store them in an airtight container once cooled, and eat within 3–4 days. Reheat in oven or air fryer to revive crispiness
Are air fryer taco bombs better than oven-baked?
Both have their perks:
-
Air fryer = faster, super crisp outside.
-
Oven = easy for larger batches with consistent brown results.
Choose what fits your situation and preference.
Can I use turkey or chicken instead of beef?
Yes, you can. Ground turkey, chicken, even leftover shredded chicken all work—just season well to keep that taco flavor popping
Will taco bombs get soggy if I microwave them?
Yes, usually. Microwaving softens the dough shell. Use the oven (350°F for 8–10 mins) or air fryer (325°F for 6–8 mins) for best crispiness
Final thoughts
If you’re anything like me, you don’t just cook to feed people—you cook to see their faces when they take that first bite.
And these taco bombs?
They get that face every time.
Whether you bake them for a busy weeknight dinner or crisp up a batch in the air fryer for game day—what you’ve got here is more than just a recipe. It’s fun, fast comfort food that hits every time.
And the best part?
You made it yourself.
No frozen box. No drive-thru. Just sealed-up flavor bombs from your own kitchen.
So try them. Play with the filling. Dip them in cheese. Stuff them with birria. Make them your own.
And if you do? I’d love to hear how they turned out—tag me, message me, or just send a picture of that cheesy stretch. You already know I’ll be cheering from my side of the oven.